How to Set a Static IP Address on Windows
Every computer has an unique Internet Protocol Address. An Internet Protocol address is a largely numeric identification code used to represent computers on the internet. Internet Protocol or IP uses up to twelve characters that are usually numbers, with the exception of IP six which uses an alpha numeric representation. Static Internet Protocol is often compared with dynamic Internet Protocol. This is due in large part to the fact that Static Internet Protocol addresses are configured to each computer and are therefore unchanging, while Dynamic Internet Protocol addresses are changed every time the computer is rebooted. This happens as a result of most routers assigning an Internet Protocol address to the Computer dynamically. As with all things, there are pros and cons when setting up a Static Internet Protocol address, but once you have decided to go this route, you will find that the setup process is not a very difficult one.
INSTRUCTIONS
- First, turn on your computer and wait for it to boot. After the computer has been successfully booted, go to your start menu at the bottom left hand corner of your screen. Some computers will simply have an icon to represent this feature.
- After clicking start, look to the right of the pop-up menu and select the Run option from the same. At this point a prompt window will pop up with a drop down menu asking users to make a decision. Type “cmd” in the open box and select ok. This option will take you to a Command Prompt window.
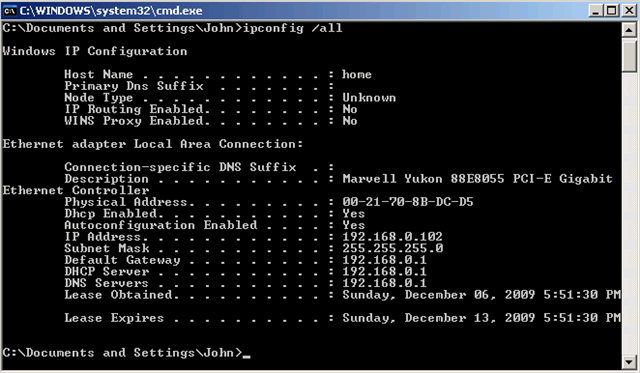
- After the Command Prompt window has been opened, type “ipconfig /all” in it. After ensuring that this command is correctly entered, press the enter key. At this point a lot of information will be displayed.
- From all the information listed on the screen, users should use the scratch pad to make note of the following as it will be needed later on:
- IP Address, Subnet Mask, Default Gateway and Name Servers.
- After recording the information, type the word “exit” into the same window and press the enter key to close it.
- Go back to the Start menu at the bottom left hand corner of the screen and once again look to the right of the pop-up menu. Select the Control Panel option from the menu.
- In Control Panel, select “Network Connections” or “Network and Internet” depending on the version of Windows you are using using. When the Network window is opened, right click the internet connection that you use to connect to the internet and select “properties”.
- From the Properties menu, select Internet Protocol (TCP/IP) and then click the properties button. A window will pop-up and you should record the information on this page before making any changes. This will help to ensure that any changes made can be undone if necessary.
- To make changes, first pick an IP address (one can use the IP address for the router and simply change the last number). The last number of the chosen IP address should be between 1 and 254.
- Enter the information that was previously recorded on the scratch pad. That is, place the Subnet Mask information in the Subnet Mask section and do the same for Default Gateway and Name Servers.
TIPS AND WARNINGS
- If, after making your IP address static, you cannot load any web pages, there was possibly an error in the DNS that was entered. In this case, you should contact your service provider in order to figure out the correct DNS information.
- A Static IP address is most useful when you are port forwarding as the forwarding address needs to be a fixed one. If the IP address were dynamic, you would not be able to receive a signal and load web pages because port forwarding cannot take place.
Joy is a technical guy and also content builder for many sites and he likes to write on technical topics and issues. Nowadays he writes on simple topic like how to change IP address, How to hide IP, how to set static IP etc. and share it for peoples


Leave a Comment