Cocos2D For iPhone Tutorial 5 – Labels, Menus, And Menu Elements
We really wore our fingers raw in our last tutorial by running dozens of touch events! In this tutorial I will be showing you how to make a gorgeous button-filled menu for your iOS app. By menu, I mean an array of buttons that can either be made from an image label or a text label, and can have a function executed when they are pressed. These menus can either be placed in their own scene, like a game start menu, or as a control menu overlaid on a scene.
Before we can make a text label in a menu, we need to know how to make a text label. As you may have noticed, this is exactly what the default Cocos2D program does. However, the way it positions it on the screen is a little advanced, so here is my slightly modified version:
#import "HelloWorldScene.h"

@implementation HelloWorld

+(id) scene
{
	CCScene *scene = [CCScene node];

	HelloWorld *layer = [HelloWorld node];

	[scene addChild: layer];

	return scene;
}

-(id) init
{

	if( (self=[super init] )) {

		CCLabelTTF *label = [CCLabelTTF labelWithString:@"Hello World" fontName:@"Times New Roman" fontSize:64];

		label.position = ccp(240,160);

		label.color = ccc3(255, 255, 255);

		[self addChild: label];
	}
	return self;
}

- (void) dealloc
{

	[super dealloc];
}
@end
The above code in HelloWorldScene.m will output “Hello World” to the screen with the font “Marker Felt” and with the font size “64”.
CCLabelTTF *label = [CCLabelTTF labelWithString:@"Hello World" fontName:@"Marker Felt" fontSize:64];
This line creates a label called “label” that is the member of the CCLabelTTF class. In order to give it some basic properties, we have to set it equal to, or initialize it, with a CCLabelTTF object with a label, font, and font size. The label and the size are self-explanatory, but for more fonts check out this list.
label.position = ccp(240,160);
Like many objects in Cocos2D, labels have the property “position”. This line simply sets the position of the center of the label equal to the coordinate (240,160). Take note that this is a ccp, or CGPoint, coordinate. This is the kind of coordinate that you use in Cocos2D.
label.color = ccc3(255, 255, 255);
Another property that labels have is color. Here, we set the label’s color to white. It is unnecessary to set a color, and the default is white. The color is an RGB code, and I suggest you use a color picker like this one to choose a color.
There you have it, we placed a simple label on the screen. There are other kinds of labels, but we will save them for later tutorials.
Next, let’s create our menu.
#import "HelloWorldScene.h"

@implementation HelloWorld

+(id) scene
{
	CCScene *scene = [CCScene node];

	HelloWorld *layer = [HelloWorld node];

	[scene addChild: layer];

	return scene;
}

-(id) init
{

	if( (self=[super init] )) {

		CCLabelTTF *start = [CCLabelTTF labelWithString:@"Start!" fontName:@"Georgia-Bold" fontSize:25];
		CCLabelTTF *options = [CCLabelTTF labelWithString:@"Options" fontName:@"Georgia-Bold" fontSize:25];

		CCMenuItemLabel *item1 = [CCMenuItemLabel itemWithLabel:start target:self selector:@selector(startGame:)];
		CCMenuItemLabel *item2 = [CCMenuItemLabel itemWithLabel:options target:self selector:@selector(optionsPage:)];

		CCMenu *menu = [CCMenu menuWithItems:item1, item2, nil];
		[menu alignItemsVertically];

		[self addChild:menu];
	}
	return self;
}

-(void)startGame:(id)sender{
//code goes here
}

-(void)optionsPage:(id)sender{
//code goes here
}

- (void) dealloc
{

	[super dealloc];
}
@end
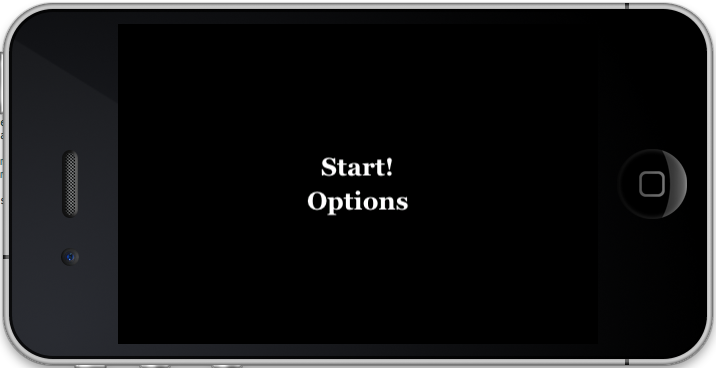
The above code will produce this:
CCLabelTTF *start = [CCLabelTTF labelWithString:@"Start!" fontName:@"Georgia-Bold" fontSize:25];
CCLabelTTF *options = [CCLabelTTF labelWithString:@"Options" fontName:@"Georgia-Bold" fontSize:25];
The first thing we have to do to create a menu item with a label is actually create the labels. These two lines of code create two labels with the font Georgia-Bold.
CCMenuItemLabel *item1 = [CCMenuItemLabel itemWithLabel:start target:self selector:@selector(startGame:)];
CCMenuItemLabel *item2 = [CCMenuItemLabel itemWithLabel:options target:self selector:@selector(optionsPage:)];
Next, we create two menu items, item1 and item2. They are of the class CCMenuItemLabel. We then have to initialize them with a label (the name of a CCLabelTTF object that has been created), a target, and a function to run when they are touched.
-(void)startGame:(id)sender{
//code goes here
}

-(void)optionsPage:(id)sender{
//code goes here
}
Skipping down a little bit, these are simply the two void functions that our menu items will call when they are touched. We will add some content to them in a later tutorial.
CCMenu *menu = [CCMenu menuWithItems:item1, item2, nil];
This line creates a menu called “menu” and it initializes the menu with the items “item1” and “item2”. We set the last item to “nil” to end our menu.
[menu alignItemsVertically];
Without this line, all of the elements on our menu would be stacked on top of each other. This line aligns our menu items vertically. You could also align the items horizontally, or specify the position of each menu item. By default, the menu is placed in the center of the screen, but we could also specify the exact position (menu.position) of the menu.
Our program now displays a nice text menu on the screen. However, if we were to make a game, we would want graphical menu items. No problem, we can do that in Cocos2D quickly and easily.
#import "HelloWorldScene.h"

@implementation HelloWorld

+(id) scene
{
	CCScene *scene = [CCScene node];

	HelloWorld *layer = [HelloWorld node];

	[scene addChild: layer];

	return scene;
}

-(id) init
{

	if( (self=[super init] )) {
		CCMenuItem *item1 = [CCMenuItemImage itemFromNormalImage:@"start.png" selectedImage:@"startPressed.png" target:self selector:@selector(startGame:)];
		CCMenu *menu = [CCMenu menuWithItems:item1, nil];
		[menu alignItemsVertically];

		[self addChild:menu];
	}
	return self;
}

-(void)startGame:(id)sender{
//code goes here
}

- (void) dealloc
{

	[super dealloc];
}
@end
The above program will display the following when run:
CCMenuItem *item1 = [CCMenuItemImage itemFromNormalImage:@"start.png" selectedImage:@"startPressed.png" target:self selector:@selector(startGame:)];
This line creates a menu item called “item1” that is initialized with the images start.png and startPressed.png, the target “self”, and the function “startGame”. The image file specified after the method “itemFromNormalImage” is the initial image of the menu item, and the image file specified after the method “selectedImage” is the image of the menu item while it is being touched.
That’s all for now, folks! I hope you found my tutorial helpful.


Leave a Comment