RobotC Tutorial 2 – Hello World And Programming
Now that you’ve got the basics for the Lego Mindstorms, we can start programming. To start, open up RobotC and open a new file. Outputting text is the first thing you will do with almost any programming language, so let’s start with a program that displays “Hello World” on the screen. Note that this program will not be very useful in actual programming, but I’m doing this to demonstrate that RobotC can display “Hello World”.
task main() //the start of all RobotC programs { // the start of the function
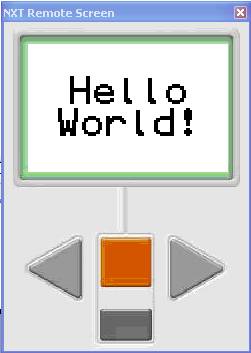
eraseDisplay(); //clear the NXT display // now to display "Hello World" nxtDisplayCenteredBigTextLine(2, "Hello"); nxtDisplayCenteredBigTextLine(4, "World!"); while (true); //loop until program is terminated (so we can read the display) } //the end of the function |
This is what it will look like. Don’t worry about the commands, for they are not used much in RobotC.
Now that we have that out of the way, we can start with the actual programming. Let’s start with a basic program that tells you robot to move forward and backward.
task main() //this is the starting for all RobotC program { //the start of the function
motor[motorB] = 50; //tells the robot's B motor to go forward at 50 power motor[motorC] = 50; //tells the robot's C motor to go forward at 50 power wait1Msec(1000); //runs previous tasks for 1000 milliseconds, or 1 second motor[motorB] = -40; //tells the robot's B motor to go backward at 40 power motor[motorC] = -40; //tells the robot's C motor to go backward at 40 power wait1Msec(2000); //runs previous tasks for 2000 milliseconds, or 2 second } //the end of the function |
This program makes the robot move forward at 50% power for 1 second,and then move backwards at 40% power for 2 seconds. For the power, I would advise that you dont run the power at 100 because the robot has a PID control that speeds up or slows down to get the desired speed. having the motor at 100 power will not allow the PID control to speed up the motor to get the desired speed. No need to understand that now, I will explain it more in a different tutorial.
So, positive values make the robot go forward, and negative values make the robot go backwards. How do I make it turn?
There are two simple ways to turn your robot. There are other ways, but that’ll come later. This is another simple program demonstrating them.
task Main
{
motor[motorB] = 50; motor[motorC] = -50; wait1Msec(400); motor[motorB] = 0; motor[motorC] = 50; wait1Msec(800); } |
First, this program tells the robot to turn on a dime to the left (assuming the B motor is the right one) for .4 seconds. It then tells the robot to turn in an arc for .8 seconds. That’s all for now, I’ll see you next time when I’m explaining functions!


Leave a Comment