Objective-C Tutorial 3 – If Else Statements And Basic Looping
And it’s time for a shiny, new Objective-C tutorial! In our last tutorial, we covered variables and data types. In this tutorial, we will be covering the famous if else statements as well as loops. Enjoy!
The if-else Statement
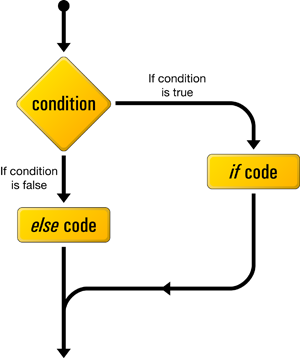
So what exactly is an if else statement? It is a statement that allows the computer to test a condition and execute a chunk of code if it is true, or execute a different chunk of code if it is false. Here’s a picture that might help you grasp the concept:
Now if we translate that diagram into objective-c, we get:
if (condition) {
//true commands } else {
//false commands } |
Now that code won’t run on it’s own, so let’s add some structure and content:
#import <Foundation/Foundation.h> int main (int argc, const char * argv[]) {
NSAutoreleasePool * pool = [[NSAutoreleasePool alloc] init]; int x = 2; if (x < 5) {
NSLog(@"X is less than 5"); } else {
NSLog(@"X is equal to or greater than 5"); } [pool drain]; return 0; } |
This program will output “X is less than 5” because, well, X is less than 5.
Let’s now go through the if else statement in our program.
if (x < 5) {
The “if” statement begins the if else statement. In it, declare it an if statement and give a condition. The condition is given in the parenthesis and is, in this case, “x<5”. If x is less than 5, then the code inside the curly brackets of the if statement will be run.
NSLog(@”X is less than 5″);
This is the code that will be run if the condition that is declared in the if statement is true.
else {
The “else” statement ends the if else statement. We simply declare it by typing “else” and start the body of it with a curly bracket. The code that is in the curly brackets of the else statement is what will be run if the condition declared in the parenthesis of the if statement is false.
NSLog(@”X is equal to or greater than 5″);
This is the code that will be run if the condition that is declared in the if statement is false.
If we change the value of x from 2 to 7, then the code inside the else statement will be run because the condition x < 5 will be false. That is:
#import <Foundation/Foundation.h> int main (int argc, const char * argv[]) {
NSAutoreleasePool * pool = [[NSAutoreleasePool alloc] init]; int x = 7; if (x<5) {
NSLog(@"X is less than 5"); } else {
NSLog(@"X is equal to or greater than 5"); } [pool drain]; return 0; } |
This program will output “X is equal to or greater than 5″ because the value of x, 7, is greater than 5. That makes the condition ” x < 5″ false.
The While Loop
Okay, now that we have gone over the basic if else statement, let’s get to some loops! A loop is a block of code that is repeated until or while a particular condition is satisfied. First, let’s go over the while loop.
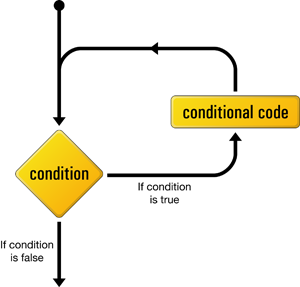
A while loop is a loop that runs a block of code over and over until a specified condition is true. Here’s another image that may help you grasp the concept:
The computer checks to see if a condition is true. If it is, then a block of code in the while loop is run. If it isn’t, then the code isn’t run. Every time the block of code runs, the same process occurs.
Any questions should clear up after we go over this next bit of code:
#import <Foundation/Foundation.h> int main (int argc, const char * argv[]) {
NSAutoreleasePool * pool = [[NSAutoreleasePool alloc] init]; int x = 20; while (x >= 10) {
NSLog(@"%i", x); x = x - 1; } [pool drain]; return 0; } |
This program will output “20 19 18 17 16 15 14 13 12 11 10” (each number on a new line). As usual, we’re going to go through the new code that you haven’t seen before (if you don’t understand a line that I leave unmentioned, look at previous tutorials).
while (x >= 10) {
This line starts the while loop by declaring the loop “while” and giving a condition. In this case, the condition is “x is less than or equal to 10” . As long as the value of x is less than or equal to the value of 10, the code inside the curly brackets will be run. It is important to make sure that the code inside the curly brackets changes the value of a variable in the condition so that the code doesn’t run infinitely.
x = x – 1;
All we’re doing here is setting x equal to be one less than the current value. This can also be written as:
x--; |
The reason we are setting the value of x to be one less is so that the while loop doesn’t run infinitely. Eventually, x is no longer greater than or equal to 10.
The For Loop
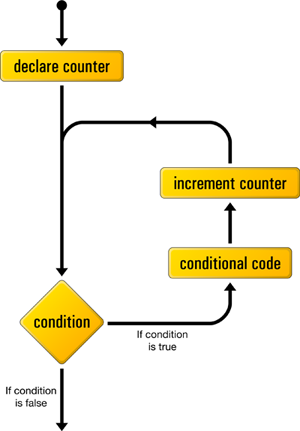
The next loop we are going to go over is the “for” loop. This is the most complicated, so pay close attention! A for loop is useful if you want to run some lines of code a certain number of times.
As usual, here’s some code with a for loop that we will go over:
#import <Foundation/Foundation.h> int main (int argc, const char * argv[]) {
NSAutoreleasePool * pool = [[NSAutoreleasePool alloc] init]; int y; for (y = 0; y <= 20; y = y + 1) {
NSLog(@"%i", y); } [pool drain]; return 0; } |
This program will output the numbers 1 through 20 to the console window.
for (y = 0; y <= 20; y = y + 1) {
The for loop is declared with “for” (I bet you didn’t see that coming!) and is followed by three expressions in parenthesis. The first expression (in this case “y=0;”) sets a variable equal to something as a starting point. Notice how we declared the variable “y” before the for loop. Instead of doing that we can declare the variable and set its value right inside this expression. (like this: ” for (int y = 0; y<=20; y = y + 1″)” ). Now, as I mentioned previously, this is only a starting point. The second expression sets a limit on the value of the variable. In the case of this program, out limit is ” y <= 20″. That is, as long as y is less than or equal to 20, the code inside the loop will run. It would seem that the code inside the loop would then run forever, but this is where the third expression kicks in. The third expression manipulates the value of the variable in some way so that the limit set in expression 2 is eventually reached. The most common things to do with the value is either increase it by one (which is what the third expression in this program does) or decrease it by one. Similarly to how “x = x – 1” is the same thing as “x–;” (as mentioned in the explanation of the while loop), “y = y + 1” can be re-written as “y++”.
To summarize, the first expression sets the value of the variable, the second sets a limit on the value of the variable, and the third changes the value of the variable so that it eventually reaches the limit.
NSLog(@”%i”, y);
You’ve seen this before, but I want to point a couple of things out. The first being that this is the code in our for loop that is run a certain number of times (in this case, 20). The second is that this is a useful way of increasing the value of a variable by a certain amount each time a chunk of code is run. You can use the same variable in your loop as the one used in the expressions.
The Do While Loop
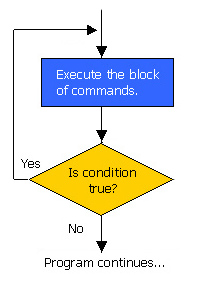
The last loop that I want to go over in this tutorial is the do while loop. The do while loop is very similar to the while loop but with one major difference. That difference is that the code inside the loop is run once before the condition is tested. If you don’t understand what I’m saying look at the following image:
 Now compare that to the diagram of the while loop, and you should see the difference. Now, let’s study some more code:
#import <Foundation/Foundation.h> int main (int argc, const char * argv[]) {
NSAutoreleasePool * pool = [[NSAutoreleasePool alloc] init]; int z = 10; do {
NSLog(@"%i", z); z = z - 1; } while (z >= 0); [pool drain]; return 0; } |
do {
That’s all there is to declaring a do while loop. The “do” declares the do part of the do while loop and the opening curly bracket opens/starts the loop.
z = z – 1;
I know that this is probably getting annoying, but I want to mention this one last time. This line can also be written “z- -;”
} while (z >= 0);
The closing curly bracket closes/ends the loop body. Now this is where the while part of the do while loop comes in. After the “do” code is run, the while condition is checked and, if it is true, the “do” code will be run again. If it is false, than the program will continue and the “do” code won’t be run again. Take note that there is a semicolon after the condition (expression in parenthesis).
Some more information regarding operators…
Now that we’ve covered most of the loops, I would like to provide a little more information regarding conditions. You probably gathered most of the information you need to know from the above code, but I’m going to clarify anyway. There are 6 different comparison operators that you can use to compare two values/ variables, and here they are:
| Operator | In words | Example |
| < | Is less than | X < 5 |
| > | Is greater than | X > 5 |
| == | Is equal to | X == 5 |
| != | Is not equal to | X != 5 |
| <= | Is less than or equal to | X <= 5 |
| >= | Is greater than or equal to | X >= 5 |
Now say you want to have multiple conditions that have to be met in order for a chunk of code in a loop or an if else statement to be run. Well, you can insert “&&” between the conditions in the parenthesis and all of them will be checked. This is referred to as the AND operator. Here’s an example:
#import <Foundation/Foundation.h> int main (int argc, const char * argv[]) {
NSAutoreleasePool * pool = [[NSAutoreleasePool alloc] init]; int n = 10; if (n > 0 && n < 20) {
NSLog(@"n is between 0 and 20!"); } else {
NSLog(@"n is not betwen 0 and 20"); } [pool drain]; return 0; } |
See if you can figure out what will be output by looking at the code.
| Okay, now say that you have multiple conditions and you want at least one of them to be true. You would want to use the OR operator. It is typed like this: “ | ”. Like the AND operator, the OR operator is is placed between the expressions like so: |
#import <Foundation/Foundation.h> int main (int argc, const char * argv[]) {
NSAutoreleasePool * pool = [[NSAutoreleasePool alloc] init]; int n = 15; if (n == 10 || n == 20) {
NSLog(@"n is equal to either 10 or 20"); } else {
NSLog(@"n is not equal to 10 or 20"); } [pool drain]; return 0; } |
Like the previous code, I suggest you test yourself and se if you can figure out what the output will be.
Well, that’s all for now. See you next tutorial!


Leave a Comment